Tuesday, August 25, 2015

Welcome Back!

Welcome Back!


Welcome back!
 Please open the link below to learn about the schedule for next week. The link gives information both visually and audibly. Please make sure you have your sound on to get all details. Total time for the presentation is less than 3 minutes and it has been successfully tested on both a computer and phone. If you cannot open the link let me know and I will send a separate email. The link was created using Google slides and SnagIt, an app that captures video display and audio input. Both of these apps would be excellent presentation tools in the classroom for teachers and students. I’m happy to answer any questions regarding both apps. https://goo.gl/uf2f4A
 See you next week!
 Christy

Wednesday, July 30, 2014

Some new iPad app favorites

New iPad apps are always popping up and with so many to chose from it's hard to decide what to bother to look at, let alone which to use with your students. Some new favorites brought up at the District iPad training:

https://tellagami.com/
Tellagami is a mobile app that lets you create and share a quick animated Gami video, using an avatar to tell your story or lesson.
It's is a fun, new way to share animated messages. Customize your character. Change its mood or outfit. Record your voice or add dialogue. Then share your Gami. Cost: Free (but to unlock more choices fees are involved).


http://www.morriscooke.com/?p=134
Explain Everything is an easy-to-use design, screencasting, and interactive whiteboard tool that lets you annotate, animate, narrate, import, and export almost anything to and from almost anywhere.
Create slides, draw in any color, add shapes, add text, and use a laser pointer. Rotate, move, scale, copy, paste, clone, and lock any object added to the stage. Add existing photos, objects, import PDF documents from local storage, Google Drive, Dropbox or insert a fully functioning web browser window. Cost: $2.99

Saturday, October 12, 2013

Google

Improve Students’ Search Skills

Google in Education has created a series of lessons to help guide students to use search meaningfully in their schoolwork and beyond. On the Google Search Education website, you’ll find Search Literacy Lesson Plans and “A Google a Day Challenges aligned to the Common Core State Standards. The search literacy lessons are categorized by subject area (Culture, Geography, History, Science) and search expertise (Beginner, Intermediate, Advanced). The classroom challenges help students put their search skills to the test and engage them in using technology to discover the world around them.

Click Here To Visit Web Site 

Click Here to Access Free Lessons

Saturday, September 07, 2013

Picture of poster, posted from Sandy Karas Liptak's blog with permission
Encourage Digital Citizenship
     
      Common Sense Media’s online glossary will help both teachers and parents—especially those who are new to 1-to-1 programs—discover the latest buzzwords used in today’s educational technology landscape and familiarize themselves with digital classroom tools. In addition, the Common Sense Media website provides a freely downloadable Family Media Agreement for K–5 and Customizable Device Contract, both of which are age-specific tools to help parents talk about technology guidelines at home and set up boundaries with which their children feel comfortable.

Click Here to Access Free Glossary

Click Here to Download Free Family Agreement

Click Here to Download Free Device Contract

Plus: Common Sense Media’s series of 1-to-1 Essentials – Educational Videos may be shared freely in professional development workshops, on your school’s website or at a family engagement night.

Click Here to Access Free 1-to-1 Videos

Monday, August 12, 2013

Dictate Your Text Entries

MAC Tips:  On the iPhone, Siri gets a lot of attention not just for its ability to understand natural-language queries and deliver results, but also for its voice dictation feature. You speak, and your words become text. But Mountain Lion now supports voice dictation in any text field. To start dictation, press the Fn key twice on Macs that include that key (such as laptops), or choose Edit > Start Dictation. (You can change the key in the Dictation & Speech preference pane.) A microphone icon appears, indicating that the Mac is listening. Speak in a normal tone of voice, and specify punctuation where needed ("Dear Jane comma sorry I haven't written recently period new paragraph"). When you're done speaking, click the Done button or press the Return key. Mountain Lion sends the audio to Apple for processing—their powerful data centers can analyze the data faster than your Mac does—and then enters the text. Although the transcription isn't always perfect, it's impressive how well this feature works.

Excerpted from OS X Mountain Lion Pocket Guide by Jeff Carlson

Monday, August 05, 2013

Starting Your New App from Launchpad

Mac Tips
When you purchase an app from the App Store, the download process places the new app in your Applications folder, and it is also accessible from Launchpad. Third-party apps (those not from Apple) appear in Launchpad on a secondary screen, not on the first screen (reserved for Apple applications) that appears when you enter Launchpad. To access the additional screens in Launchpad, click the Launchpad icon in the Dock, and then do one of the following:
  • On a Magic Mouse, swipe left with one finger on the mouse surface.
  • On a Multi-Touch trackpad, swipe left with two fingers on the surface.
  • Click one of the small dots that appears near the bottom of the Launchpad screen, but above the Dock. The white dot indicates which Launchpad screen is currently visible.
  • Tap the right-arrow key to go to the next Launchpad screen, or tap the left-arrow key to return to the previous screen.
Excerpted from Mac OS X Lion: Peachpit Learning Series by Robin Williams and John Tollett

Monday, July 29, 2013

Gatekeeper Security


gatekeeper
Mountain Lion can monitor the origins of applications you add to your machine and warn you if they might not be what you prefer. This feature is known as Gatekeeper. With Gatekeeper, you can choose to run only apps from the App store written by developers registered by Apple, allow App store apps by unregistered developers, or allow any apps from any source to run. Depending on how Gatekeeper is configured, you'll see various alerts about the security of apps you add to your machine.
  1. Go to the Apple menu and choose System Preferences.
  2. Click the Security & Privacy icon.
  3. Click the General tab.
The Gatekeeper section at the bottom of the dialog helps to control what happens when you try to download new applications. These options control warning messages that you'll see when you try to install something that this choice doesn't allow.
  • If you choose the Mac App Store option, apps that you didn't download from the App Store will not be allowed to run when you try to launch them.
  • The safest option is Mac App Store and Identified Developers, which limits your new programs to App Store apps created by Apple identified developers. This means that the app has been submitted by a developer that registered with Apple and received a personalized digital certificate they can use to sign their apps cryptographically. Signed apps can be checked to see who developed them and if any modification has occurred since the developer submitted the app to the App Store.
  • The riskiest option is Anywhere. Choose this option and you'll instantly see a strongly worded warning message. This option lets you install anything you want that isn't yet known to be malicious software.
Excerpted from OS X Mountain Lion: Peachpit Learning Series by Lynn Beighley

Monday, July 22, 2013

Create Your Own Font Collections

MAC TIPS
A Collection is a subset of the installed fonts. It's simply an easy way to look at fonts you like, instead of having to grope through a lengthy font list of typefaces you don't know or want. To make a new Collection, begin by opening Font Book in your Applications folder or in Launchpad. (If you don't see the Font Book window, choose Window > Font Book.) Then click the plus (+) sign at the bottom of the Collection pane and name your new Collection. Click the All Fonts collection (so you can access all fonts); then drag font names from the Font pane to the new Collection name. To disable (turn off) an entire Collection, select it in the Collection pane. Then choose Edit > Disable Collection Name.

Excerpted from Mac OS X Lion: Peachpit Learning Series by Robin Williams and John Tollett

Monday, July 15, 2013

Make the Spell Checker Behave

MAC TIPS
Options for the spell checker are found at the bottom of the Edit menu in Apple applications. You can also turn these features on or off as defaults in the preferences for the application. The menu option will override the default for that document. You'll have a more successful experience with the spell checker by controlling a few of the options:
  • Stop automatic corrections while you're working. Under Edit > Spelling and Grammar, the Correct Spelling Automatically > While Typing setting is what makes the text correct itself as you type. If that behavior makes you crazy, uncheck the While Typing option.
  • Ignore the spelling temporarily. If the spell checker keeps telling you the same word is misspelled, but you like the word spelled the way it is, click the Ignore button when that word is highlighted by the spell checker. The spell checker will ignore it for this document, but will correct you again in the next document.
  • Teach your spell checker new words. Spell checkers typically don't recognize most people's names or jargon specific to different specialties. If you often use a particular word that the spell checker thinks is a mistake (because it's not in the dictionary that the spell checker is using), click the Learn button in the dialog box to add the word to the current dictionary. It will never bother you again. If you're not using the spell checker dialog at the moment, Control-click (or right-click) a word that the spell checker thinks is a mistake (it probably has little red dots under it). In the contextual menu that pops up, click the Learn Spelling option while the word is selected. The spell checker will add that word to its dictionary and not whine about it anymore. If the word is misspelled, spelling suggestions will appear at the top of the contextual menu.
Excerpted from OS X Mountain Lion: Peachpit Learning Series by Lynn Beighley
Picture thanks to toonlet.com/creator/dcannell (Peachpit MAC Tips)

Sunday, July 14, 2013

Thursday, July 11, 2013

iCloud Tabs: Continue Your Online Reading on a Different Machine

MAC TIPS
"Since I use several devices throughout the day, I often begin to read something on one machine,and then want to continue later when I'm using another Mac or my iPhone or iPad. With my iCloud account, I can click the iCloud Tabs button to view which windows and tabs are open on any of my devices, and pick up right where I left off."

Excerpted from OS X Mountain Lion Pocket Guide by Jeff Carlson (Peachpit MAC Tips)

Tuesday, July 12, 2011

Convert any Web Page into an e-book

If you're a web surfer like me, who sees an article you'd like to read but not right now, this application may be for you. I come across all kinds of good education articles and have a thought that I'd like to read them more in depth when I have more time. I rarely go back to the site, not because I don't want to read the article but because usually, I forget where I saw it. This application allows you to click a button and save the converted article. Dot e Pub is "a push button cloud based e-book maker". If you're reading an article on the web and want to save it for a later read, you can use this application. This way you can read it later even if you're not on the web. Besides working on your desktop or laptop it can be used with iPhone, IPad and IPad Touch. Click on the DotePub picture link to access the site.


Info accessed while tweeting, thank you Laine Rowell.

Wednesday, July 06, 2011

Apple opened a "Teachers" Section on iTunes Appstore

Apple announced a “Teachers Section” on the Appstore. Some of the showcased apps include Wunderlist HD, Doceri Remote, Brainpop, Garage Band etc. Some are free and some (most) have a price. You can browse the selections by clicking here

The applications are organized in categories:

  • Classroom Tasks
  • Curricula Support
  • Instructional Tools
  • Personal Organization
  • Reference

This makes it easy to find apps for your classroom. They also have a Summer Learning for Kids Section

Tuesday, July 05, 2011

Bookmarking a Favorite Site to Your Home Screen

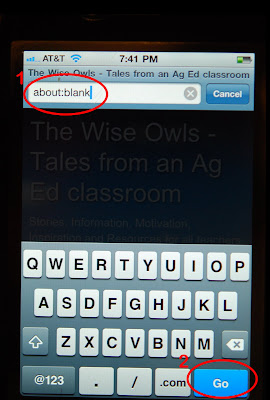
Schools out and now you have time to play with all your fun tech devices. If you're using an iPad, iPod Touch or iPhone you may have noticed that when you launch Safari it always opens by reloading the last page you used. There's a way to open to a new blank page every time or a favorite site and skip this reloading process, by using iOS's bookmarking feature.

                                   Launch Safari


               and type about:blank in the URL field and tap Go.


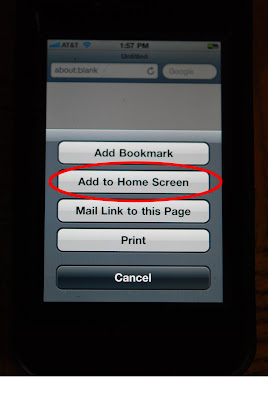
             A completely blank page will load. Tap on the share icon* (see note below)


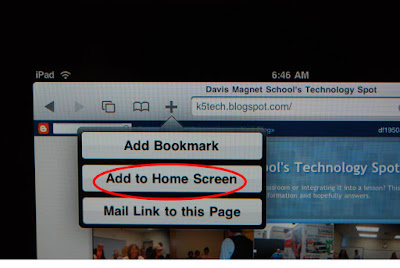
        After tapping share, tap on Add to Home Page.


A dialog box appears, type in the name of your bookmark for example - New Page,

                                      then tap Add


            and the icon will appear on your home screen.


You can use the bookmarking feature to add a bookmark to your favorite web site onto your home screen.

After opening your favorite site tap on the share icon and go through the steps to add it to your home screen.
Back to Top


*Note: Your device may have a different share icon, instead of a box with an arrow it may just be a + sign. They both do the same thing, offer you ways to share the web site. back to next step
Information from Dan Frakes,iOS Central, Macworld:July 2011
Photos from Techiedeb

Sunday, December 12, 2010

OCCUE Tech Festival


*Saturday, January 22, 2011
Time: 8:15am-3:30pm
Location: Mater Dei High School
1202 West Edinger Avenue
Santa Ana, CA 92707

Keynote Speaker: Lynell Burmark

Register to Attend

Already have projectors in your classrooms?
Are you using them to develop higher order thinking skills (HOTS) and create transmedia activities where students interact with information rather than passively gazing at it?
Come get mind-bending ideas for learning that’s applied, not just regurgitated. Discover the coolest free tool ever! Find out how to get Interactive White Boards at half-price and enter a drawing for for a free copy of Lynell’s new book: They Snooze, You Lose! Go to amazon.com now to pre-order They Snooze, You Lose! and Lynell will sign it at Tech Fest.

About Lynell
Lynell Burmark began her teaching career at Stanford University where she received the Walter Gores Award for Excellence in Teaching. Subsequent classroom experience spanned K-graduate school. Since 1995, Lynell has consulted to high-tech companies and school districts, and keynoted conferences and educational events throughout the U.S. and Canada. Her classic book, Visual Literacy, won the book of the year award for publisher ASCD. Her latest book – They Snooze, You Lose: An Educator’s Guide to Successful Presentations – takes visual literacy to the next level with new research and more practical applications. Visit www.educatebetter.org for more information and free resources including downloadable articles and banks of images suitable for educational use. Lynell is passionate about the use of images in presentations and feels the highest praise is when someone says: “You practice what you preach!”

More about Lynell from previous post. Scroll down to see post on Lynell Burmark

*pictures and info taken from CUE email